

Table of Contents
Our software team have been doing an amazing job updating the device and app software towards something we can be very proud of.
For the best AirSpot experience update your app software first from the app landing page:
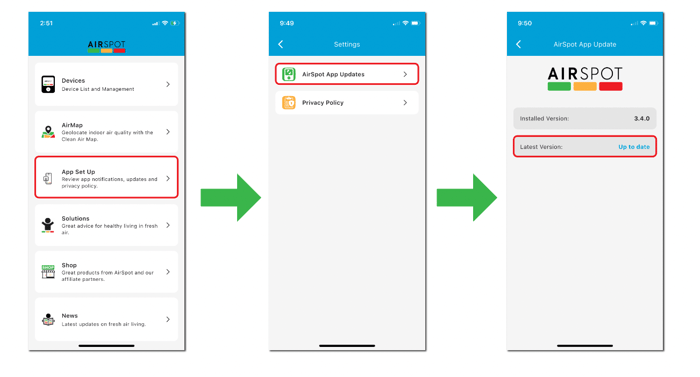
Then from the device list and management tab of the app landing page you can update the device software on your BlueTooth connected AirSpot devices:

We will always keep looking to improve further - your feedback is extremely welcome - so please get in touch with your ideas and suggestions via support@airspothealth.com
Here is a highlight of some of the new features:
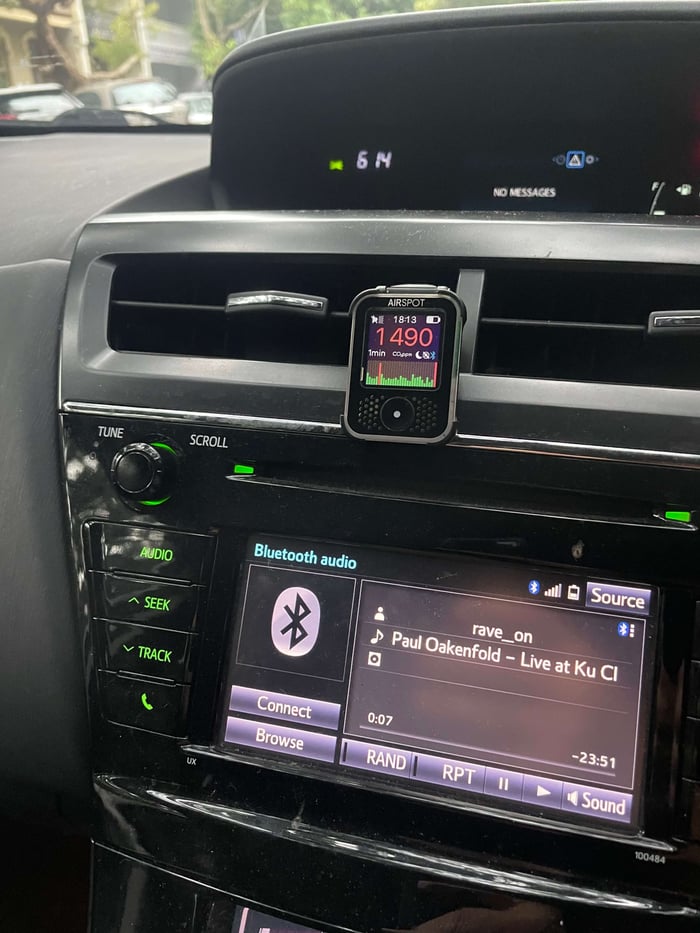
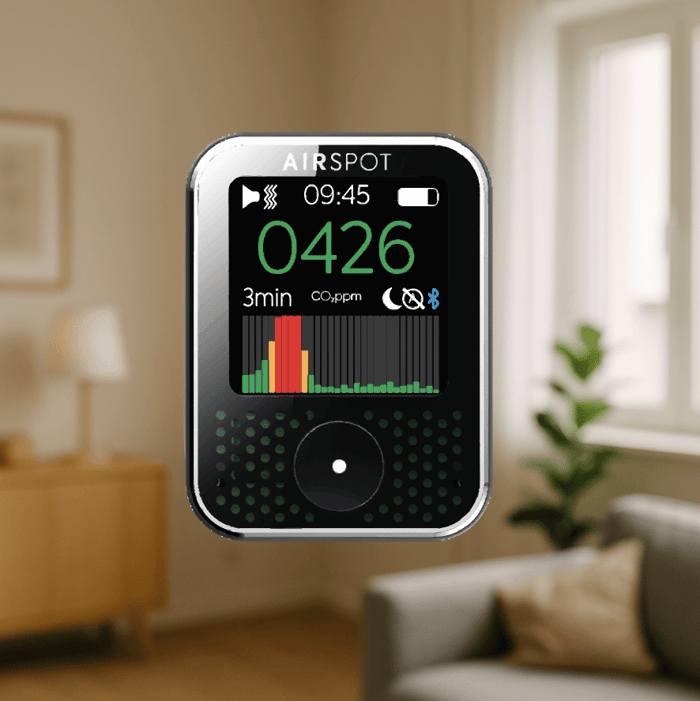
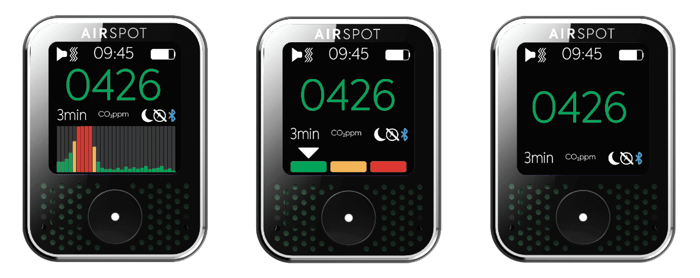
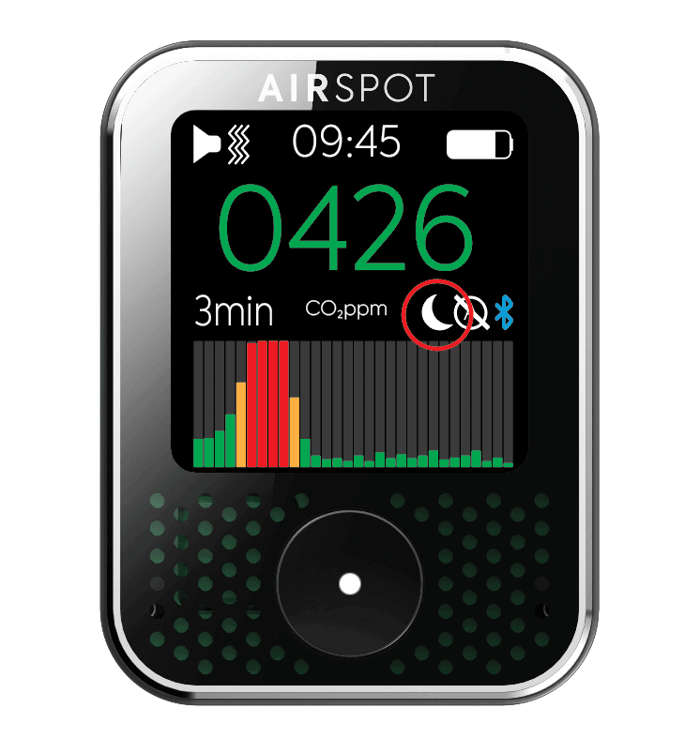
AirSpot Device Bar Graph
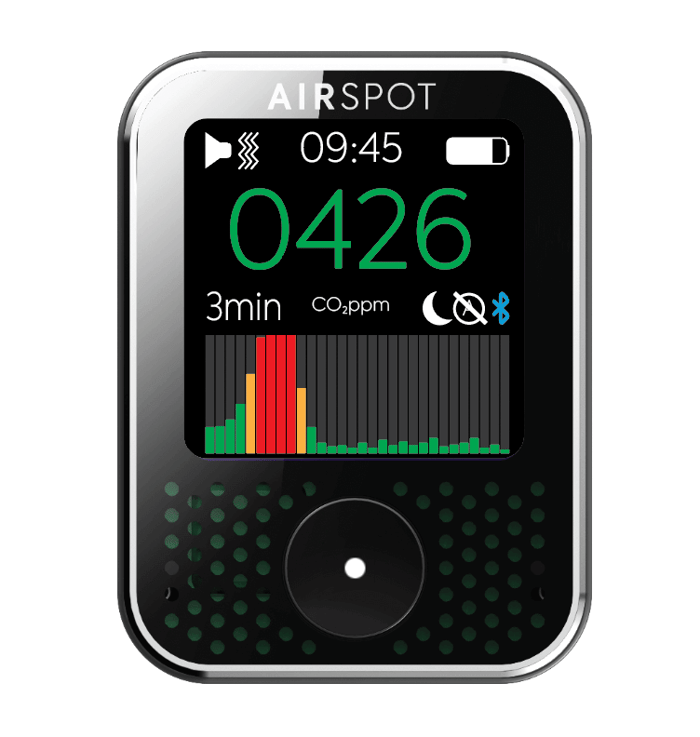
The new bar graph on the AirSpot device is fantastic.
It provides an extremely convenient way to quickly visualise recent trends in CO2 levels.
The last 30 measurements are provided.
The frequency of CO2 measurement on the device determines the time interval between each bar - for example if the CO2 measurement frequency is set to 1 minute the bar graph will provide updated bars on the right hand side of the graph every 1 minute.
The lower and upper limits of the bar graph can be set via the AirSpot app.
The on device graphs default to a baseline CO2 of 0ppm and an upper limit of 1600ppm.
You may want to change the limits to see the maximum variation around the what may be considered the actionable range of indoor CO2 levels - a baseline at 400ppm and upper limit at 1200ppm.
You’ll also notice there’s a couple of other software settings here allowing for the screen to display the traditional colour blocks, or a plain version which displays just the current CO2ppm number on the device screen.
Excellent work Peter and Narendra in bringing these device screen updates to fruition.
CO2 PPM Zones
Our CO2 ppm zones default to green (0 to 800ppm), amber (800 to 1000ppm) and red (above 1000ppm). This is in keeping with most standards internationally and the Clean Air Map which originated in Canada.
We are aware some countries and jurisdictions work to different colour zones - we have introduced this colour zone management system to allow for those users wishing to introduce these changes. 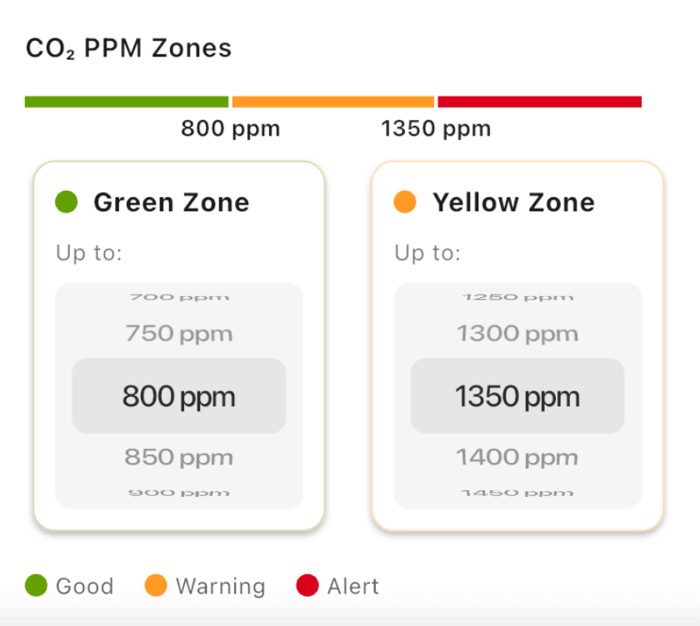
Altering the colour zones will accordingly
- alter the colour of CO2 number displayed on the device
- alter the colours of device bar graph or alter pointer position if colour blocks screen chosen
- on the app alter the colour of displayed CO2ppm numbers, graph colour and colour key, and position of mark lines on the graph
Alarms are triggered independently of these colour zone settings and beyond being turned on or off in the future they can be altered to your bespoke requirements. At present the software default is for 1 alarm/vibrate at 800ppm, 2 alarm/vibrate at 1000ppm, 3 alarm/vibrate at 1200ppm and 5 alarm/vibrate at 1500ppm.
Optimised Battery Life
With our latest release of AirSpot software we've been working hard to ensure the battery life is optimised so you can get the most our of your device.
The table below indicates the battery life for different CO2 measurement frequency settings:
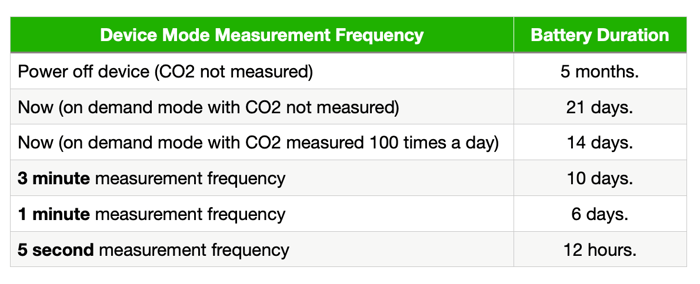
The above values will be affected by choosing to have the screen on continuously. For most settings with screen on continuously the battery life will last approximately 24hours. With 5 second measurement frequency the battery life is still estimated to be 12 hours.
Optimised Calibration
Each sensor is factory calibrated. Normally, the sensor should not need frequent recalibration. It should stay correct for months or years. Something like a significant change of altitude might affect calibration.
When you first use your AirSpot, check its calibration by placing it in fresh air, away from people or other CO2 sources, for 10-30 minutes. It is normal for readings to vary by about 50ppm from one reading to the next but it should average around 420-450ppm in fresh air. If not, here’s how AirSpot can be re-calibrated:
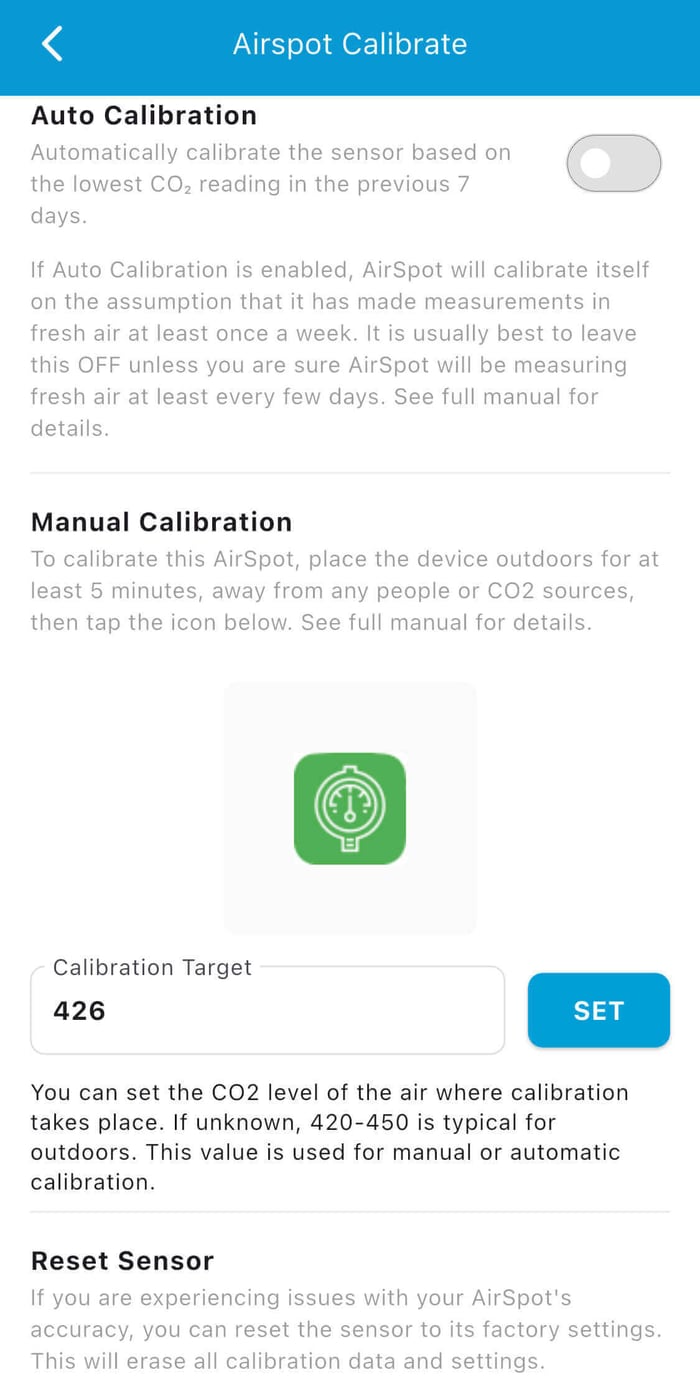
You will see that the calibration page of the app allows a choice of automatic or manual calibration.
There is also a button to factory reset the sensor. It is possible that if it’s reading incorrectly, a factory reset of the sensor will restore proper readings.
Manual calibration
Manual calibration allows you to set the CO2 level present wherever you conduct the calibration. If you have another trusted CO2 meter, you can even calibrate indoors where the level is 500ppm by entering that as the “calibration target”. Otherwise, calibrate outdoors and do not change the target.
Before conducting manual calibration, place AirSpot in a location where the CO2 level is known and is not changing. Let it stabilise for 10-30 minutes. Set the target (if known) and tap the green icon. Calibration will take 4-10 minutes depending on the update frequency the device is set to. When the countdown reaches 0, AirSpot will briefly display the amount of correction it has applied. This could be a + or – value, or 0.
After this, you should see readings which average something close to the calibration target.
Auto calibration
If “Auto” is turned on, the sensor recalibrates itself every 7 days on the assumption that the lowest reading recorded is what the target is set to (by default 426ppm).
The app shows the date when the next correction will be made. It will also recalibrate itself at any time if CO2 readings drop below 400ppm.
Do not use auto unless you are sure your AirSpot will be exposed to fresh air every few days. If you keep it indoors in an area where the CO2 never drops below 550ppm, for example, it will calibrate itself to show 550ppm as 400ppm. If you take it on a plane flight with Auto turned on, it might calibrate itself incorrectly when the cabin pressure drops.
Auto calibration is best suited for situations where
· AirSpot is frequently powered, because a flat battery will restart the 7 day cycle.
· It’s frequently in a location where CO2 will drop to fresh air levels say every night or every weekend.
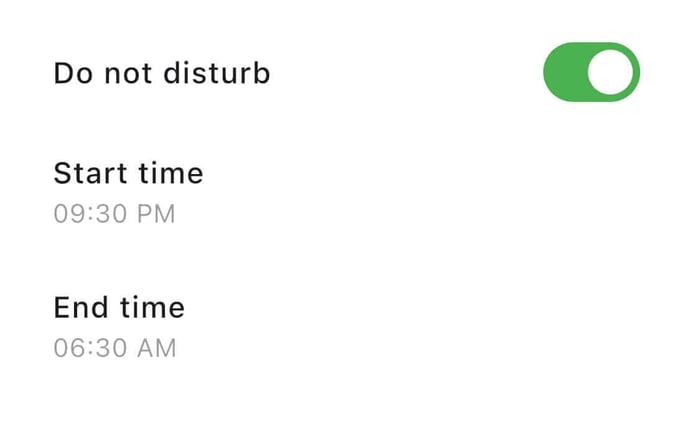
Do Not Disturb
Another great new feature of the AirSpot software update is the Do Not Disturb mode.
Most of us charge our smart devices in our bedrooms when we go to sleep at night. This is also an environment where the air quality can deteriorate if there is poor ventilation - if you haven't noticed this already you soon will!
It's frustrating to keep being woken up by alarms and also in turning the alarms off we often forget them back on again during the day time when we want them.
The 'Do Not Disturb' software feature allows AirSpot users to set and forget! Accessed via the device settings page of the app the start and end times of the do not disturb feature can be set:
When the 'Do Not Disturb' feature is enabled you'll see the crescent moon on the device screen towards the lower right side:
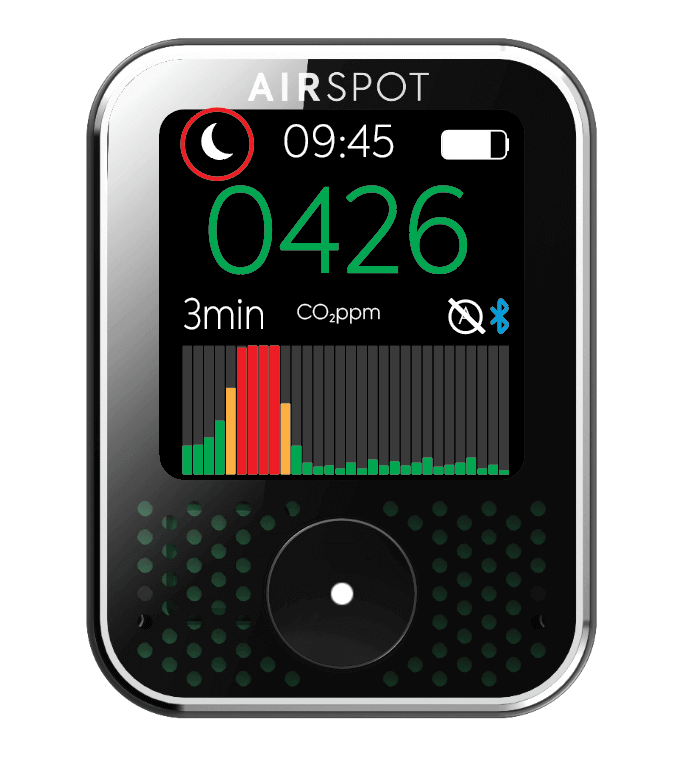
During the times that the 'Do Not Disturb' function is in action the crescent moon will appear in the top left of the device screen in place of the alarm and vibrate icons:
We spend a lot of our lives in our bedrooms - this also represents a very simple place to focus on improving air quality. Leave windows open overnight (secure fly-screens help here), leave bedroom doors open, turn on fans - all of these things will improve air circulation. Having lower CO2 levels will also lead to less tiredness on waking up in the morning.
While HEPA filters won't lower the CO2 levels themselves they will improve the air quality and are especially useful in shared bedrooms.